Build and publish a VS Code extension
Published at Jul 28, 2025
1. Why building a VS Code extension
When I have a new idea, my instinct is usually to build a website. It’s the most familiar path to show things, interact with users, share data. But this time was different.
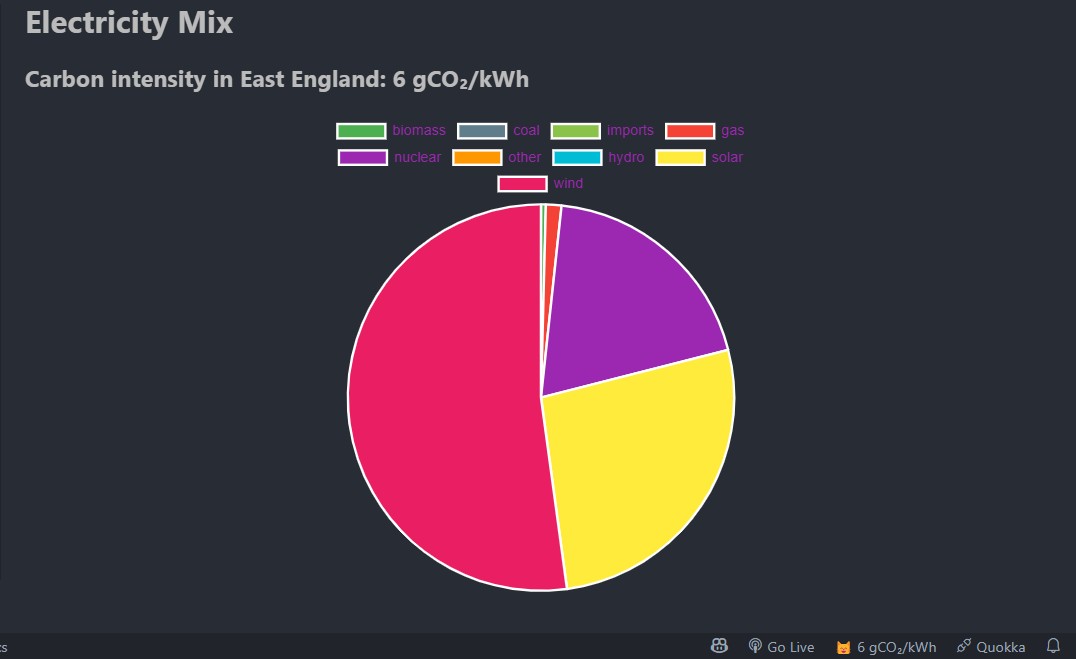
The idea behind VSCarbon wasn’t about creating another destination for people to visit (although I did build a web version called Git Good), it was about meeting developers inside their daily workflow. The VSCarbon code can be found here.
2. Scaffolding the Extension
Make sure you have Node.js and Git installed.
Start by using Yeoman Generator or yo code command to generate a TypeScript
extension template. Details can be found in VS Code docs.
npm install -g yo generator-code
yo code
Choose “New Extension (TypeScript)”, then provide a name (e.g., vscarbon), identifier, and description. This creates:
package.jsonwith metadata andcontributessettings (commands, keybindings, etc.)src/extension.tswhere you implement logicREADME.md
Extension File Structure (source: VS Code)
.
├── .vscode
│   ├── launch.json     // Config for launching and debugging
│   └── tasks.json      // Config for build task that compiles TS
├── .gitignore
├── README.md           // Description of functionality
├── src
│   └── extension.ts    // Extension source code
├── package.json        // Extension manifest
├── tsconfig.json       // TypeScript config
3. Developing Features
Inside extension.ts, register commands and functionality. For instance:
import * as vscode from 'vscode'

export function activate(context: vscode.ExtensionContext) {
  const sayHello = vscode.commands.registerCommand('vscarbon.hello', () => {
    vscode.window.showInformationMessage('Hello from vscarbon!')
  })
  context.subscriptions.push(sayHello)
}
Modify package.json to declare commands under "contributes":
"contributes": {
  "commands": [
    { "command": "vscarbon.hello", "title": "Say Hello" }
  ]
}
Note: The activate function is the entry point of a VS Code extension. VS Code
automatically calls this function when the extension is loaded (usually after a
command is triggered, unless marked with “activationEvents”: [”*”] in
package.json)
4. Testing
Press F5 to launch the Extension Development Host. Make incremental changes and reload to test behaviour live.
5. Advanced Features
Depending on project goals, you could add:
- Webviews or Side panels for UI-based interactions
- Tree views or Status bar items
- Completion, hover, or code lens providers for language intelligence
VS Code also has a globalState where you can write key/value pairs (similar to
localStorage in browser). VS Code manages the storage and will restore it for
each extension activation.
async function setPostcode() {
  // ... input validation logic ...

  if (postcode) {
    // save postcode (in lowercase) to globalState under key "postcode"
    await extensionContext.globalState.update(
      'postcode',
      postcode.trim().toLowerCase()
    )
    // show a message (in uppercase for readability)
    vscode.window.showInformationMessage(
      `Postcode set to: ${postcode.trim().toUpperCase()}`
    )
    // update carbon data now that a postcode is available
    updateCarbonIntensity()
  }
}
Read more at VS Code extension capabilities
6. Packaging and Publishing
Once ready, package the extension using the vsce CLI tool:
npm install -g @vscode/vsce
vsce package    # produces vscarbon‑<version>.vsix
vsce publish    # if you have a publisher set up and PAT token configured
Set the extension version and engine constraints in your package.json. Ensures
icons and assets follow marketplace security rules. Details about publishing
rules can be found in VS Code docs
For me, I haven’t published VSCarbon on marketplace yet. I released it on GitHub after packaging it into a .vsix file. Users can download the file then install it, using VS Code extensions tab.